Tuesday, August 14, 2012

Chocolate Cherry Cupcakes

I've been avoiding the "gotta get my act together and start prepping my classroom for the first day back at school" stuff.  Y'all, my to-do list is LOOOOOONG.  (I don't usually say "y'all".  How was it?  I like it.  I'm keeping it.)


Well, it would be if I actually made a to-do list but I haven't.  I will, though.  It's on my list of things to do.

Instead, I made cupcakes.  Chocolate cherry cupcakes.  You're gonna LOVE them.  I promise.


Start with your basic chocolate cupcake recipe.  You can use whatever you love or use mine, which I tweaked from TidyMom.

For the cupcakes, you'll need:

1 box chocolate cake mix (I prefer Pillsbury but your fave will work great, too)
3 eggs
1/2 cup butter, melted
1 cup water
3 tbl. cocoa powder
1 small can cherry pie filling

Mix first 5 ingredients in large bowl, 1 minute on low then 1 minute on med, until well combined.  Scoop batter into lined cupcake tin.  I use a spring-loaded ice cream scoop but use whatever works for you.  Fill cups about 2/3-3/4 full.  Bake at 350 for 20 minutes.  Cool in cupcake pan for 5 minutes then move cupcakes to a wire rack to cool completely.


Next, use your handy dandy cupcake corer (or a small paring knife) to cut out the middle of the cupcakes.  (Yes, I know those are not chocolate cupcakes in the picture.  I forgot to take a picture of my corer so I'm reusing an old picture I took.  It's OK.  Really.)


Fill the center of each cupcake with a scoop of cherry pie filling.  I made sure there were at least two cherries in each cupcake.

Now you're ready for buttercream.  Here's what you'll need:

5 cups powdered sugar (don't sift it, that's too much work)
1 cup butter, softened
1 tsp. vanilla
juice from maraschino cherries

Beat the butter until smooth.  Add powered sugar, vanilla, and approximately 1/4 cup of cherry juice.  Beat with mixer on medium speed until combined and smooth.  Scoop into pastry bag (or freezer weight hefty zip bag), snip off corner and pipe onto cupcakes.  For these cupcakes, I wanted a rose look to the buttercream so I used my Wilton 1M open star tip, started in the center of the cupcake and piped frosting in a tight circle around the middle to the outer edge.


You can top these with a cherry if you'd like.  I didn't because I wasn't serving them immediately and I didn't want the cherries to leak juice all over the cupcakes.  But I thought about it.  So, I ate most of the cherries and then I used the excuse that I didn't have enough cherries to put one on each cupcake.  Don't judge me.

Go make these.  They're delicious.  And, if you're a teacher starting down the ugly end of the back-to-school madness like I am...you have my full permission to make just the cherry buttercream and not share it with anyone.  And, once you've done everything on your classroom-setup to-do list, can you come help me with mine?

Pin It

Monday, August 6, 2012

Olympic Torch Cupcakes


In May, I was asked to make torch cupcakes for my friend's son's Olympic-themed birthday party.  I was both excited and daunted by the challenge.  They turned out great, though, and everyone really enjoyed them.

To make these yourself:

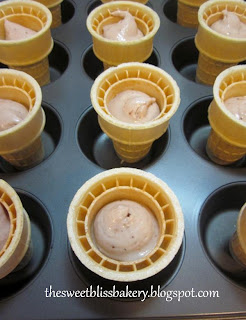
Start with filling ice cream cones with cupcake batter.  I tried this two ways.  One way seemed easy but didn't turn out very well.


The cupcakes didn't rise up into the cones so all the cake was at the top.  Not fabulous.

So,  tried a second way that turned out MUCH better!  This time I filled a bag with cupcake batter and squirted it into the cones.  This was so much better.


As you can see, the cake filled the cone and left a nice, little rounded cupcake on top.  Some of them didn't fill out the top of the cone completely but you can cover that with more frosting.

I just stood these up in my regular cupcake tins to bake them (at 350 for 20 minutes) and didn't have any trouble with them tipping over.


I forgot to take pictures of this next part but if you go to wonderwomancreations you can see a picture of what I did.  I took my frosting piping bag (I use these) and drizzled orange gel paste coloring (I prefer AmeriColor) down two of the sides of the bag before filling with yellow buttercream.  Most of the bloggers I stalk follow will tell you to paint it down the sides of the bag but I'm lazy and just squirted a little in bag.

Then I used my Wilton 1M tip and with even pressure, squeeze frosting onto the cupcake and move the bag straight up to make flames.  Erica at Sweet Tooth did these awesome Hunger Games cupcakes that were my flame inspiration.


To transport these, I used robe boxes--the kind that you get at Christmas or you can just buy some at Target.  I used a box cutter and cut large Xs into the box and then bent back the sides of the Xs.  They held the cupcakes perfectly still on our way to the party.  (I also did these for my friend's mom who took them to Portland from Seattle and she said they survived the trip beautifully.)


Since this was an Olympic-themed party, when it was cake time, my friend explained to the kids that the Olympic flame is passed around the world in a show of solidarity and friendship.  She then had the kids circle the house, put candles in each torch cupcake and the kids passed the flame, ending with the birthday boy and a rousing version of "Happy Birthday".  The kids LOVED passing the flame!  And, when it was time to watch the Olympic Opening Ceremonies, the kids were very excited to watch the flame enter the arena.

I'm loving baking cupcakes in ice cream cones.  I'm definitely going to be doing more cupcakes like this.


Enjoy!

Pin It

Monday, July 30, 2012

Gold For The Gold: Golden Oreo Pops


On Friday, our family was invited to watch the Olympics opening ceremony at a friend's house.  As I was looking through one of my Pinterest boards for a dessert idea, I came across these super easy oreo truffles.  I've been wanting to make oreo truffles and cake pops for awhile and decided this was the time to give it a try.


I pretty much followed the recipe but tweaked it slightly.  Since my friends are not huge Oreo fans (I KNOW!!!  I didn't find out until we were already good friends otherwise they might not have made the cut), I used Golden Oreos.  They turned out great and were absolutely so yummy!  You HAVE to make these and you don't need to wait for the next Olympics opening ceremony to make them.  If you NEED an excuse, you could always make them to celebrate your favorite Olympic event.  Or just because it's Monday.  I mean, Mondays are a GREAT excuse to make baked goods!

Here's what you need:


1 package Golden Double Stuff Oreos (you can use use any flavor Oreos but I recommend Double
        Stuff over the regular)
4 ounces cream cheese, softened
Wilton Candy Melts, white

I doubled this recipe.


Start by crushing the oreos with your blender or food processor.  Then add cream cheese and mix well.  I used my hands but you can use a spoon.  You can add more cream cheese but I really liked the texture and flavor of just 4 ounces cream cheese per package of oreos.


Using a 1 tbsp. scoop (I LOVE this one from Pampered Chef!), scoop cookie mixture and roll into balls.  Place on wax or parchment paper lined cookie sheet and freeze for approximately 15 minutes.  This firms the balls and allows the chocolate coating to harden faster and be less messy.


Just before taking the oreo balls out of the freezer, melt your chocolate or candy melts.  I melt mine in the microwave for approximately 2 1/2 minutes, stirring every 30 seconds, until I get the melty texture I want.  Dip a lollipop stick (I use these) into the melted chocolate--just about 1/2 an inch in--and then insert stick into firm oreo ball.  Try not to insert more than 1/2 way into ball.  Then dip ball into melted chocolate to coat.  Lift ball out of chocolate and let excess chocolate drip off.  I used a spoon to cover the top of the ball and little bit of the stick.  You can see Bakerella show off her signature technique here.


Then, over another container, sprinkle the top of the pop with gold sprinkles.  Set pop on wax or parchment paper to harden.


After they were set (approximately 15-20 minutes) I attached these fabulous free Olympic printables.  I just printed them off and used my large scalloped punch to punch them out.  Then I just taped them to each stick.


These were a huge hit!  (I need try this with the Berry Burst Oreos soon.)  Go make them and then come back and tell me how they turned out.  Just, don't blame me when you can't button your pants the next morning.


Pin It

Tuesday, July 17, 2012

Strawberry Pie

The boys and I went strawberry picking last week.  It was so fun!  We came home with LOADS of strawberries.


And, what do you do with loads of freshly picked strawberries?  Make strawberry lemonade, strawberry smoothies, and try your hand at strawberry pie.

I'd never made a strawberry pie before but, how hard could it be?  Turns out..it's pretty easy!  I followed this recipe but used fresh strawberries, obviously, instead of frozen.  It was so YUMMY!


If you find yourself with tons of strawberries this summer, definitely try this easy pie.  My boys gobbled it up!


Pin It

Wednesday, July 4, 2012

Happy 4th of July!


I LOVE the Fourth of July!  We always attend our town's parade and then have friends over.  We bbq, the kids ride bikes and play, and then when it's finally dark, we drag all our chairs out to the front of our house and watch fireworks from our front yard.  It's great!

This year we were out of town until the 1st so I didn't do any baking for the 4th but I do have photos of my baking from last year to share with you.  Unfortunately, I didn't take pictures of the process so today, instead of a tutorial, I'm just sharing the photos and will do a tutorial later.

Hope you all have a wonderful, safe, and fun 4th of July!


Pin It

Thursday, June 21, 2012

French Toast Cupcakes with Maple and Bacon


Did I ever tell you that I teach 6th grade?

I do.

I LOVE it!

But, the last three weeks of school are RIDICULOUS!  I've been buried in 28 science research projects, planning the 6th grade promotion ceremony, putting together the 6th grade slideshow, writing 25 reading report cards and 28 homeroom report cards, and closing up my classroom for the summer.

It's tiring.  But so good, too.  I love the end of the school year for so many reasons.  Of course, summer vacation is obviously reason #1.  But, also, I love the end of the year because it's a time to wrap it all up, reflect on it, and think about the changes I want to make for next year.

While I continue to stalk teacher blogs and teacher pinterest boards, you need to make these cupcakes.  I made them in May for my son's school's staff for Teacher Appreciation Week.  They are so yummy with the saltiness of the bacon offsetting the sweet of the maple buttercream.  Delish!


You can download the recipe from Scribd here.

French Toast Cupcakes with Maple & Bacon Buttercream

1 box white cake mix (I prefer Pillsbury)
3 eggs
½ cup butter, melted
2 tsp cinnamon plus spice mix from pampered chef or 1 ½ tsp cinnamon and ½ tsp nutmeg
5-7 slices bacon, cooked crisp and crumbled
On low for one minute, beat cake mix, eggs, butter, and cinnamon.  Increase speed to med-high and beat for one more minute or until batter is smooth.  Do not overmix.  Scoop into lined cupcake pan filling cups 2/3 full.  Bake for 22-24 minutes.  Cool in pan for 5 minutes before moving to cooking rack.  Top with maple buttercream and crumbled bacon.


Maple Buttercream

1 C butter softened
1 ½ tsp vanilla
5 c. powdered sugar
2-3 tsp maple extract

Cream butter, maple extract, and vanilla well.  Start with 2 tsp. extract and add more as necessary.  Add powdered sugar one cup at a time, beating well between each cup.


Enjoy!
Pin It

Tuesday, May 29, 2012

Rocky Road Cupcakes

HEY!  Guess what?

I'm still here!

Shocking, I know.  Sorry for the silence.  It's been a crazy busy month.  I have made approximately 40 dozen cupcakes this month.  Plus both of my boys had soccer practice and games and by the time the dust settled, I was EXHAUSTED!

But, I'm back.  And I have some fabulous cupcakes to share with you today.  I promise to not ALWAYS post cupcakes but...it's kind of my thang.

I was asked a few weeks ago to make rocky road cupcakes for the husband of a wonderful teacher at my younger son's preschool.  I did but then she went on vacation for a week so I just today got feedback from her.  Her husband LOVED them!  So, know I feel good about sharing them with you all.


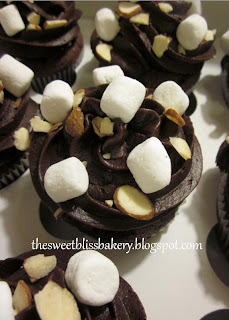
See that oozing marshmallow?  YUM!

You can follow along below or download the recipe from scribd here.


Rocky Road Cupcakes

Pre-heat oven to 350°
1 box chocolate cake mix (I prefer Pillsbury)
3 eggs
½ cup butter, melted
1 cup water
3 tbs dutch-process cocoa powder
marshmallow fluff
sliced almonds
mini marshmallows

On low for one minute, beat cake mix, eggs, butter, water and cocoa powder. Increase speed to med-high and beat for one more minute or until batter is smooth. Do not overmix. Scoop into lined cupcake pan filling cups 2/3 full. Bake for 22-24 minutes. Cool in pan for 5 minutes before moving to cooking rack.


Using a cupcake corer or small paring knife, cut a hole in the center of the cupcakes. Fill with marshmallow fluff and top with almonds.


Top cupcakes with chocolate buttercream, mini marshmallows, and more sliced almonds.


Chocolate Buttercream

1 CUP BUTTER, SOFTENED
4 CUPS POWDERED SUGAR
1 CUP DUTCH PROCESS COCOA
½- ¾ CUP HEAVY CREAM

Beat butter in a large bowl. Add powdered sugar and cocoa. Beat until mixed, adding cream in small amounts until buttercream is the right texture. I really go by feel on this.


These are very full cupcakes.  You might need a fork and a plate.  Or, you could just scarf it down as fast as possible and lick your fingers when you're done.  That's what I'd do.  Save yourself the trouble of washing an extra dish.


Pin It
 
Blog Design by Edub Graphic Art and Design